
Distance Learning Tips and Tricks > Zoom Tips and Tricks
Recurring Meetings in Zoom
To set up a recurring meeting, just schedule a meeting as you normally do and check the box below the time to indicate that the meeting is a recurring one. Recurring meetings can be scheduled at a specific time or they can be held at any time. IMPORTANT: When you leave the meeting as the host, make sure to end the meeting for all participants!
Turning off Chat in Zoom:
Some teachers have found chat helpful, others have not. You can disable it for future meetings if you want to. Just go to go to socsd.zoom.us and click Settings. Now click In Meeting Basic on the left and the setting to enable or disable chat is there. Note: You must do this before the meeting. You cannot change it during the meeting.
Turn off Virtual Backgrounds in Zoom
If Virtual Backgrounds are too districting for your group, you can turn them off for the next meeting. Go to socsd.zoom.us and click Settings. Now click In Meeting Advanced on the left. Look down the page for the Virtual Background option. You can turn it off, there. Note: You must do this before the meeting. You cannot change it during the meeting.
Turn off Annotation in Zoom
Annotation is another great tool for the students to use, but if it is not right for you (if the kids fool around with it too much,) it can also be disabled. Just go to go to socsd.zoom.us and click Settings. Now click In Meeting Basic on the left and the setting to enable or disable Annotation is down that list a bit. Note: You must do this before the meeting. You cannot change it during the meeting.
Setting up a Co-Host in Zoom
If more than one teacher are in attendance in a Zoom Meeting, did you know you can set up a co-host? This allows both of you to mute and remove participants, share screens and other host related tasks. Here is how to set that up:
Before you set up your meeting, open socsd.zoom.us and click Settings on the left. Click In Meeting, Basics on the left side of the screen and scroll down a bit until you see “Co-host Allow the host to add co-hosts. Co-hosts have the same in-meeting controls as the host.” Slide the control on the right to turn that feature on.
Now set up and enter your meeting. Once inside, use the control bar on the bottom and click Manage Participants. A bar appears on the right. Find the person you would like to make a co-host, roll your mouse over their name and click More when it appears. Click Make Co-host from the list of commands. Your co-host will be able share their screen, must and remove participants and any other tasks that the host can do.
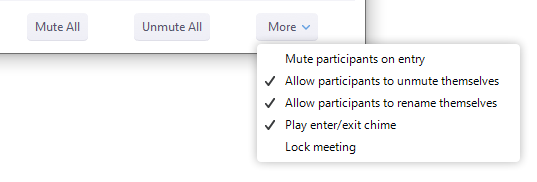
Managing Participants in Zoom:
When you leave a meeting that you are hosting, make sure you click End the Meeting for All so that students can not stay behind unsupervised.
The host can prevent students from renaming themselves in Zoom. You can also stop them from unmuting themselves. Click Manage Participants one you are in your meeting and at the bottom of the white panel on the right of the screen click More.
Creating a Screencast in Zoom
Are you interested in making screencasts through Zoom? It’s easy. Just set up a video conference and don’t invite anyone else. It’s a conference of one. On the toolbar at the bottom of the screen, there is a button that says record. Since there are no children in the conference, you can record to the cloud, if you like.
Now click on the toolbar at the bottom and share your screen. Decide which screen you want to share or just use the Whiteboard option.
Share your screen and narrate as you go.
When you are done, first, stop the screen share and then use the toolbar on the bottom to end the meeting.
Now return to the main screen on Zoom. On the left side, below Schedule Meetings and above Settings, you will find the recording tab. Any recordings you make are stored there. Click Share to the right of the one you want to share and you will find a link that you can post in your classroom or email to whomever you like.
Sharing your Phone as a Document Camera in Zoom: Android phones can also join as document camera (this method will work for Iphones as well). Start your meeting on your computer as you normally do. Send yourself a link to the conference via email and open your email on the phone. Click the link from your phone to join the conference. You will have to install the Zoom App the first time you do this. The controls are simple and straightforward. Tapping on the screen brings up two control bars. One on the top, the other on the bottom of the screen. You can switch the camera from Front to Back if you have that feature on your phone. When you sign on with your phone, don’t make your phone the host or you have to click Manage Participants and reclaim it on your computer!
Now look on the host computer, not the phone. As you are find the thumbnail of your phone on the screen and roll your mouse over it. Three horizontal dots should come up. Click those and from the menu that appears chose “Spotlight Video. ” That will make your phone video the main screen that everyone sees. Hold the phone over your page and you can use it as a document camera. Or you can be adventurous, find a couple of soup cans and take a shot a Mcgivering yourself a brand new piece of equipment out of stuff you find around the house. Good luck. There should be a command on the screen on the HOST computer that says cancel the spotlight video. That’s how you stop highlighting video from your phone. It works best if you don’t turn on the phone audio.
Polling during a Zoom Meeting
Did you know you can set up polling in Zoom? A poll is a question or set of questions that you present to your class during the meeting. The system keeps track of the results for you. Here is a link to a video and to more information.
Distance Learning Tips and Tricks > Zoom Tips and Tricks