
Distance Learning Tips and Tricks > Zoom – The Basics
Getting Into Zoom
You must enter zoom using your WEB BROWSER. Open socsd.zoom.us. NOTE: If you forget the address, there is also an icon in your Google Apps. That is the 9 squares icon you see on any Google page. You cannot get to your account just using the Zoom app or the zoom.us website. You must go in one of the ways stated above.
Your log-in for Zoom is your Google address (username@socsd.org) with your regular Google/District Password. The first time you go in, the system will ask you to confirm your email address and take you through some steps. At some point, you will also be asked to download a small program which is called a client. This is normal and safe and you should download the client as instructed.
Once your account is set up, you can confirm that all is working by entering a test conference, here: https://zoom.us/test
Setting Up Zoom
Marc’s settings recommendations are here. Use these settings to make sure your meetings are secure.
To Start the Meeting
You will be on camera in your home. Before you start the computer, check the space around you and make sure there are no personal items visible. The children will see what is around you and what is behind you. It is also a good idea to let the others in your home know that you will be on camera for a period of time.
Log into Zoom. You should see the meetings tab on the screen with an option to Start the meeting. Click to start the meeting. A box will appear asking you about the audio. Click Join with Computer Audio.

Controlling the Meeting
Now look at the bottom of your screen. When you move the mouse, a bar appears.
Mute and Video Controls: On the left, you can mute your own audio and video and can access some of the settings for each by clicking on the upward pointing arrow.
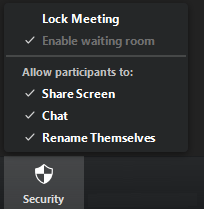
Security on Zoom
The Security button on the toolbar is something only the host or co-host of a meeting will. The Security button brings up a menu when clicked which will let you lock a meeting, so that no others may join. You can also enable and disable participant’s ability to share their screen, chat and rename themselves. This will help you keep some control over your meetings. If you don’t see this right away, you may need to wait for the program to update itself.
Manage Participants brings up a white bar on the right.
- You can invite participants using the command on the bottom of the bar. The Invite button allows you to bring up an invitation to the meeting if you need to send that to students who cannot get on.
- You can Mute All the student’s microphones with a button at the bottom of the screen. It is best to mute them all and let them unmute just to speak when it is their turn.
- At the top of that bar, any students who are in the waiting room appear and you can accept them to allow them to enter. Make sure to only approve SOCSD students. It is possible for students to set up a second Zoom account and enter using the URL of the meeting. Using this to misbehave anonymously is called Zoom Bombing and is something we want to avoid.
- You can mute a participant by rolling your mouse over their name and clicking Mute.
- You can remove a user by clicking More next to their name when you roll your mouse over their name.
- You can click More at the bottom and prevent students from renaming themselves.
Share Screen allows you to share your screen with the students. See below:
Chat brings up a chat window which students will also have access to. They can post questions, there.
Record allows you to start and stop a recording of the meeting. This can be handy.
When you begin the meeting, the system asks if you want to record locally, which makes a file on your computer, or to the cloud. Please record to a LOCAL file and post that to your Google Classroom. At the end of the meeting, the system will ask where you want to store your recording. Find a place on your computer that makes sense to you. If you are new to this, save to your desktop. When you are done, open your Google Classroom and post this as you would post any file. Posting this in your Google Classroom allows you to restrict who sees the video.
Breakout Rooms allows you to create small groups for side work and is for advanced users.
End Meeting is how you finish the meeting. In the box that pops up, you must close the room for all participants when you leave. This way, students can not remain in the meeting unsupervised.
Sharing your Screen
First, you will be sharing parts of your computer screen. Please close any personal or private things that you may have up before you do this. Please close your district email on the machine you are working on. If you need access to email during the meeting, use your phone or another device.

Sharing the screen allows you to bring up any application such as Powerpoint, Smart Notebook, a web browser which can include Google Documents or Slides. When you click share you choose which application you are sharing. Anything in that application that is visible to you is visible to them. Any changes you make are visible to them. There are drawing tools which enable you to mark up a document as you go.

When you begin your sharing session, there is a Whiteboard option which brings up a simple white screen and a few drawing tools.
These allow you to draw, erase, write text or use a spotlight, which highlights an area of the screen you want the students to focus on.
Each time you want to move between applications, or to the whiteboard, you must stop sharing and start again to bring up the new window you want the students to see.
Creating a Screen Cast
A screen cast is simply a narrated video where you do an action on a computer and narrate as you go. Here is an example of a Screen Cast: https://www.youtube.com/watch?v=cVzcS43ORpw&t=31s
There are lots of ways to make a screen cast. Zoom works quite well. In essence, you just create a meeting where you share your screen and you record the meeting. You don’t have to invite anyone in to have a meeting. Consider it a meeting with just one person. Here is how to start.
First, set up your computer by closing email and any personal items you may have open.
Next, bring up any screens you want to share or just use the whiteboard.
Now open the internet and visit socsd.zoom.us and log in.
At to top right of the screen there is a button that says Host a Meeting. Click on that and a drop down appears. Click With Video On. In the box that appears make sure to click Use Computer Audio.
Click on the toolbar at the bottom and begin to record your session to your computer.
Now click on the toolbar at the bottom and share your screen. Decide which screen you want to share or just use the Whiteboard option.
Share your screen and narrate as you go. When you are done, first, stop the screen share and then use the toolbar on the bottom to end the meeting. You will be prompted to save your video file. You may post that file to your Google Classroom or load it to your Google Drive as you would any file.
What’s the Best Way to Learn Zoom?
The best way to learn Zoom is to practice with more than one device. Set up a meeting and send out an invite to yourself via email which you can pull up on another computer, if you have one, or a phone or tablet. Look at both devices while you experiment with the program as the host. Try stuff out. Share your screen, try annotation and some of the other Zoom features. See what happens on the other device. That’s what your students will see.